

This article reflects updates to Davis Advantage for two books: Medical-Surgical Nursing, 3rd Edition (Hoffman) and Pathophysiology, 3rd Edition (Capriotti) on May 18th regarding the AI Tutor (PAIGE). Please note other Davis Advantage RN-level titles will include AI Tutor (PAIGE) in the Fall.
Click the Add Class button to begin.

Class Setup
After you click the Add Class button, the Class Setup page will open.
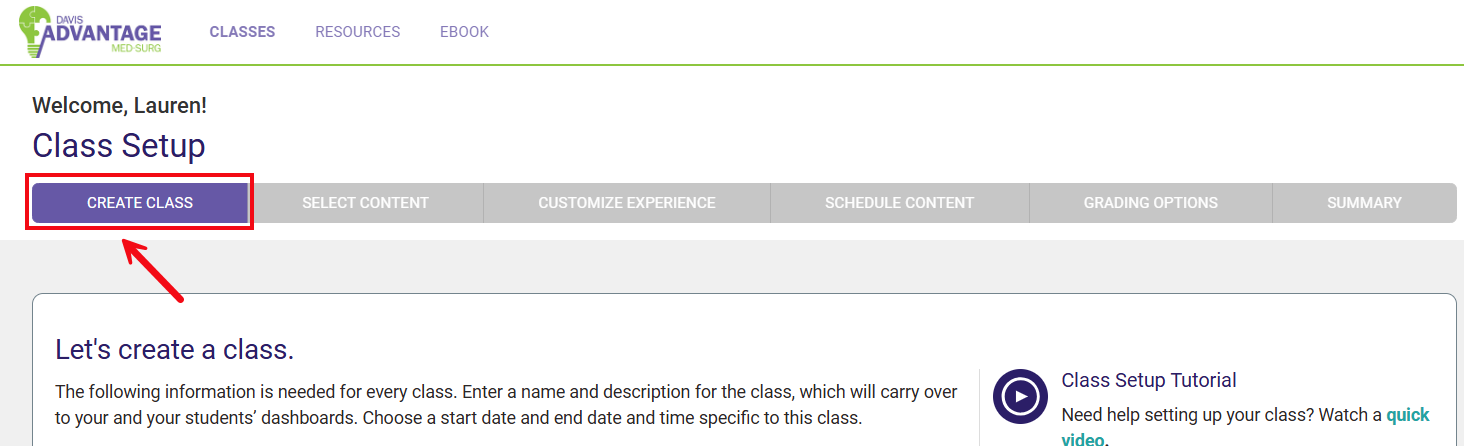
You will begin on the first tab, Create Class. Enter your class details on this page.
Class Name: Enter the name of your course that your students will recognize, usually the course code or title, followed by the semester or section number. This is a required field.

Description: You may also enter a description of your course for students (this description will appear on their dashboard). This field is optional.

Start Date and Class End Date: The Start Date is the first day on which your class will be available to your students. The End Date is the final day on which your students' work will be accepted. Change the dates by selecting from the calendar icons and clicking the dates you would like. These are required fields.

End Time and Time Zone: The End Time is the time at which assignments must be submitted by your students in order for their work to be accepted on time. The End Time will also determine the time at which your class ends on the End Date.
Be sure to select your Time Zone now, as you can only select your time zone once.

Auto-Enroll Students: this box will be pre-selected so that your students are automatically enrolled in your class when they enter your Class ID. (See section on Class ID.) If you do not opt to use the Auto-Enroll Students function, you will need to manually accept students requests to join your class.

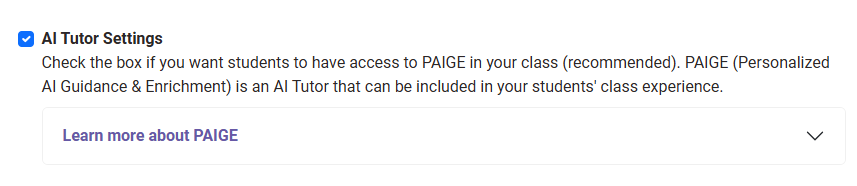
AI Tutor Settings: This box is defaulted to being checked, which means that by default, PAIGE, the AI Tutor is enabled for a new class. Uncheck the box to disable the AI Tutor. You can click Learn more about PAIGE to get more information on the AI Tutor.
Independent Study: Check this box if you want students' independent work (anything completed outside of a class) to be imported into your class upon enrollment. Work from other classes cannot be imported. Leave this un-checked if you want your students to begin with a "clean slate." We recommend starting fresh by not checking this box.

Custom vs. Default Settings: You will be asked to choose whether you would like to customize your class settings (recommended) or use the default settings*. Once you have made your selection, click Next Step to save your progress and proceed to the next tab.
Note: you must select Next Step to save and advance in each section of Class Setup.
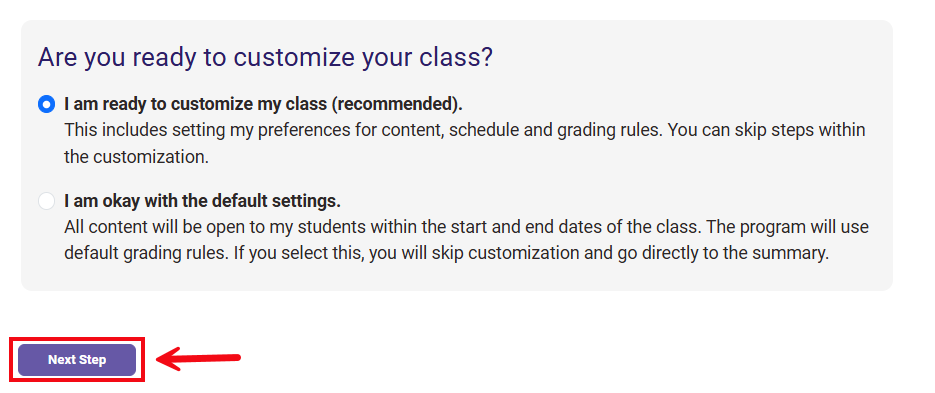
*If you have opted to keep the default settings, please skip to the Class ID section of this article.
Content Model
Please select a Content Model, either Traditional or Concept. For ease of scheduling and teaching, topics have been grouped into families.
For a Traditional organization, these topics are often taught together. For a Concept organization, these are topics pertaining to the same concept. Note that the content is the same in either case, just ordered differently, and can also be re-ordered after this selection.
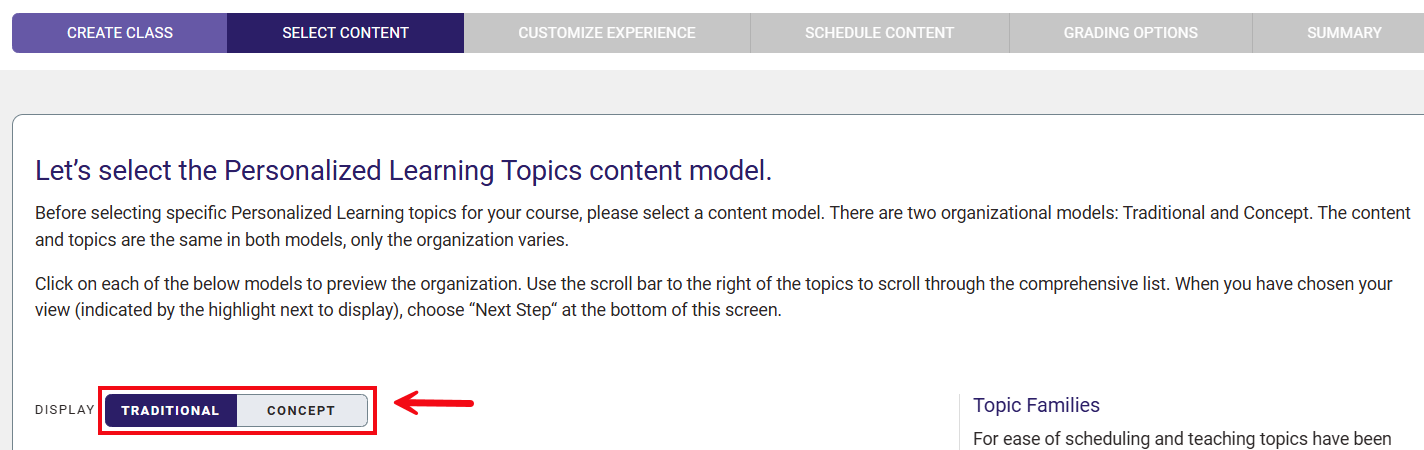
Select Next Step to confirm your selection. This selection can only be made once, but content can be further re-ordered in any way you like.

Select Content
On the Select Content tab, you can customize the content in your course to correspond to the topics you will be teaching. You will begin by selecting which Personalized Learning Assignments you would like to use.
Turning Topics On and Off: By default, all topics are included, buy you may remove any individual topic by clicking the button in the Status column to turn a topic from ON to OFF.
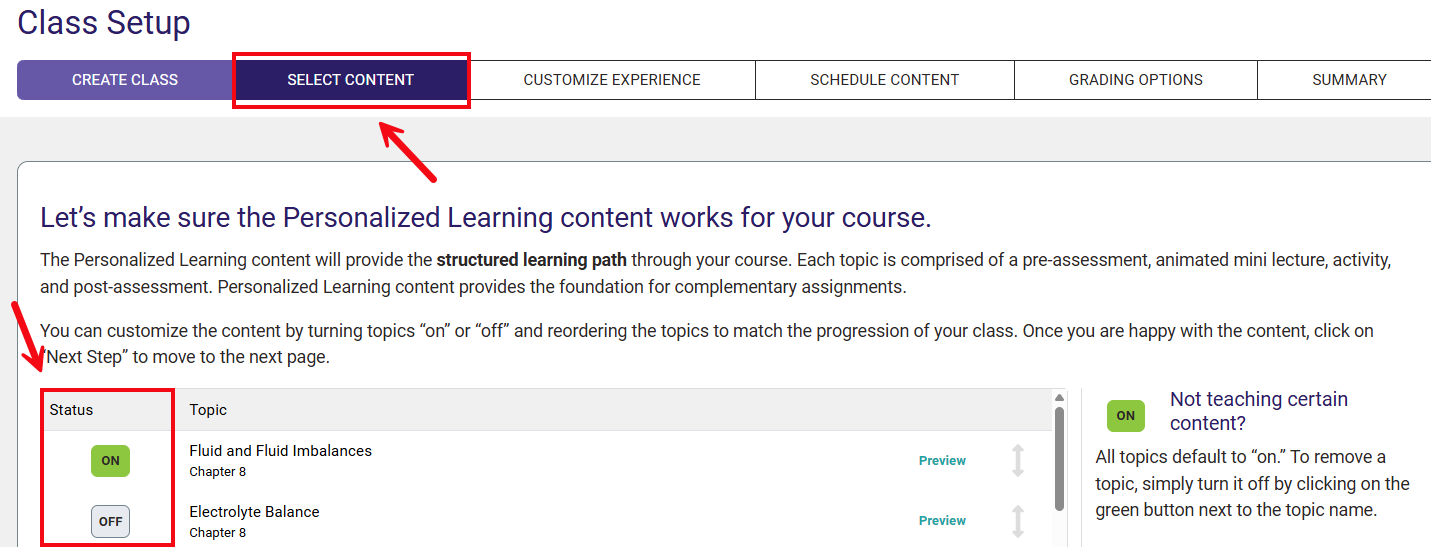
Preview Content: To view the content within any Personalized Learning Topic (video, activity), as well as the answer keys for the pre- and post-assessments, click on the Content, Pre-Assessment and Post-Assessment link alongside each topic in the "Preview" section.

Reorder Topics: To change the order of topics to match your course, click and hold to drag and drop the topic using the arrow icons in the right column of the page.

To save and continue, click Next Step at the bottom of the page.
Customize Experience

On the Customize Experience tab, you will be able to choose the learning requirements for the Personalized Learning Assignments and whether you would also like to include Clinical Judgment and/or Quizzing Assignments in your course.
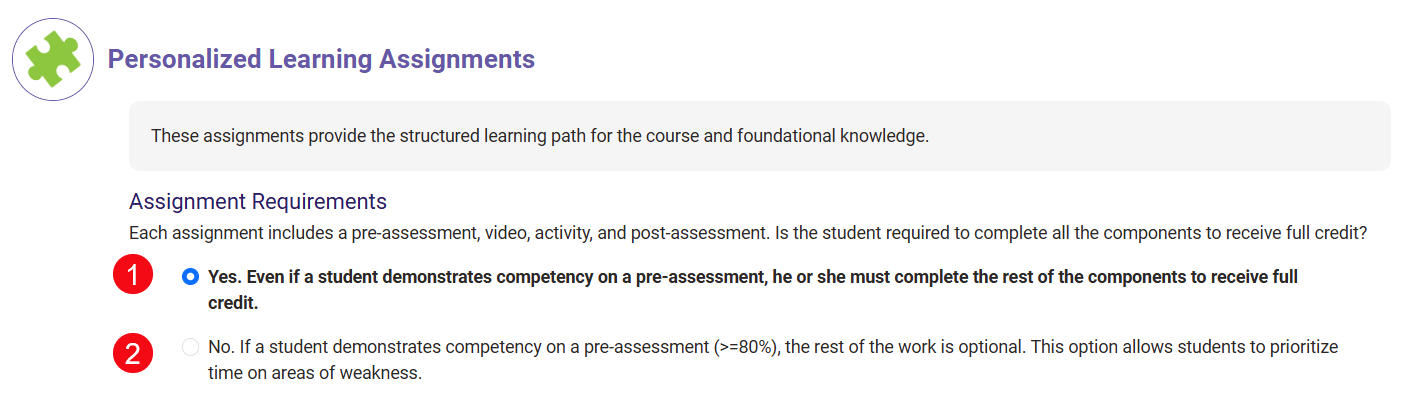
Customize Personalized Learning Assignments
Each Personalized Learning Assignment includes a pre-assessment, video, activity, and post-assessment. Here you will choose how students progress through the different parts of the assignment.
First, choose from options for the requirements of the assignment:
Option 1: Yes. Even if a student scores 80% or better on the pre-assessment, they must still complete the video, activity, and post-assessment in order to receive full credit for that topic.
Option 2: No. If a student scores 80% or better (green thumbs-up) on the pre-assessment for a topic, that student is not required to complete the video, activity, or post-assessment to receive full credit for that topic and may proceed to the next chapter.
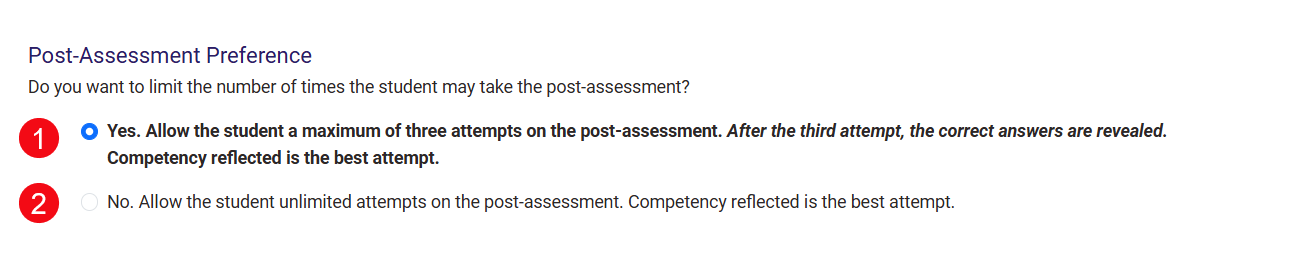
Next, choose whether to limit the number of times a student may take the post-assessment. Whether you allow unlimited or only three attempts, students' best attempt (by the due date) will be recorded.
Option 1: Yes. Allows the student three attempts on the post-assessment, after which the correct answers are revealed to the student. Competency reflected is the best attempt of the three allowed.
Option 2: No. Allows the student unlimited attempts on the post-assessment. Competency reflected is the best attempt. Pre-assessment answers are not revealed.
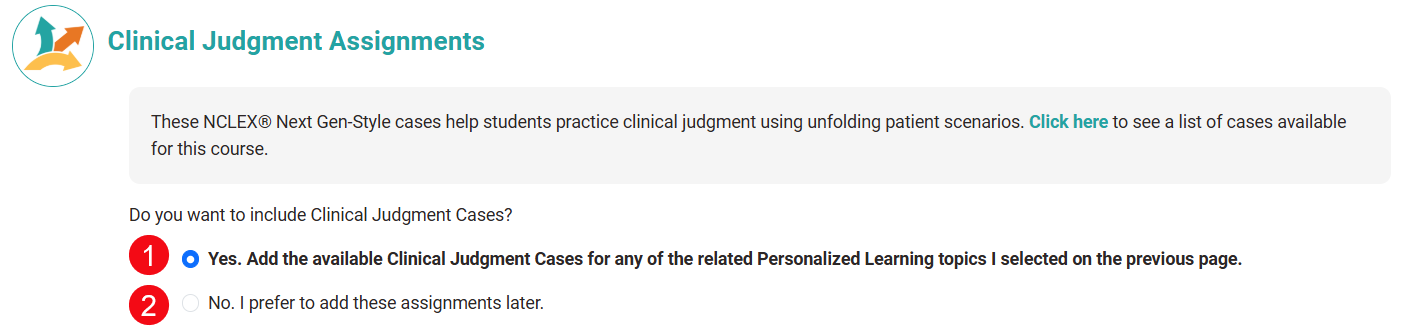
Customize Clinical Judgment Assignments
Clinical Judgment Assignments can be added or excluded from any course. Clinical Judgment Assignments build clinical judgment skills based on cases related to specific topics within the course. These NCLEX® Next Gen-Style cases help students practice clinical judgment by immersing them in robust patient scenarios.
Option 1: Yes: Adds the available Clinical Judgment Cases for any of the related Personalized Learning topics selected on the previous (Select Content) tab.
Option 2: No: Excludes Clinical Judgment Cases at this time.
Note: Pre-set assignment content (Clinical Judgment Assignments, Simulation and Quizzing Assignments) will be based on Personalized Learning content selected at the time of class creation. If you choose to “turn off” Personalized Learning content after class creation, the corresponding pre-set assignment will be deleted; however, no automatic pre-set assignments can be added after class creation.
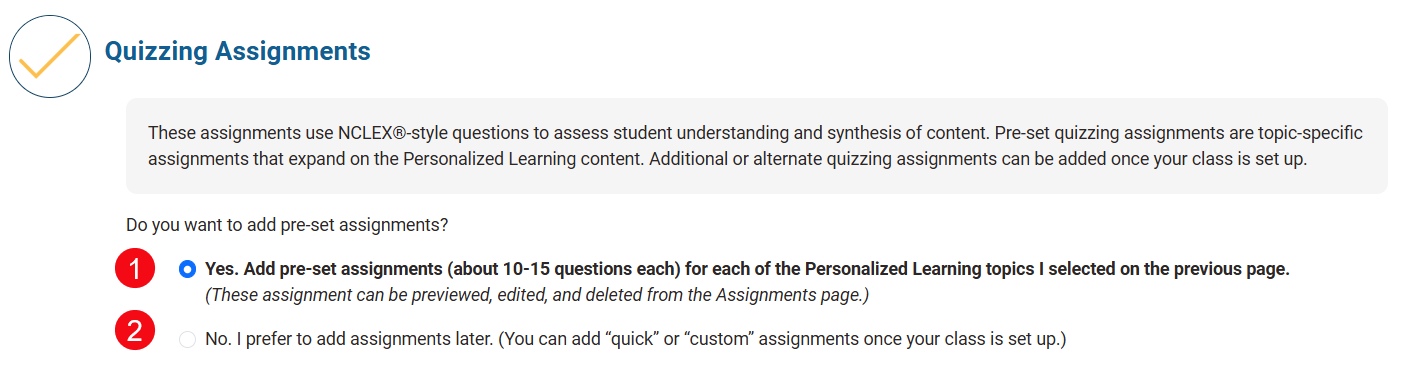
Customize Quizzing Assignments
Quizzing Assignments use NCLEX®-style questions to assess student understanding and synthesis of content.
Pre-set quizzing assignments are topic-specific, comprehensive assignments that are already prepared for you. These assignments can be previewed, edited and deleted once the class is created. Additional or alternate quizzing assignments can also be added once your class is set up.
Option 1: Yes: Adds pre-set assignments (10-15 questions each) for each of the Personalized Learning topics selected on the previous page. (Pre-set assignments can be individually deleted later, and you can add additional assignments.)
Option 2: No: Does not add any pre-set Quizzing Assignments at this time. (You can add assignments once your class is set up, but will do so manually.)
Note: As with the Clinical Judgment Assignments above, pre-set assignment content will be based on Personalized Learning content selected at the time of class creation. If you choose to “turn off” Personalized Learning content after class creation, the corresponding pre-set assignment will be deleted; however, no automatic pre-set assignments can be added after class creation.
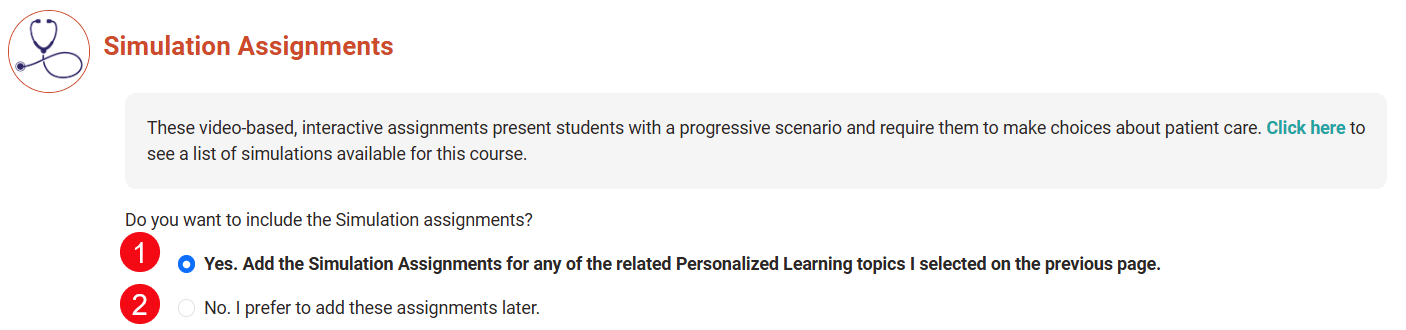
Customize Simulation Assignments
Simulation Assignments can be added or excluded from any course. Simulations are video-based assignments that show realistic portrayals of nurse-patient interactions in a hospital setting. Students must use the video and Electronic Health Record to answer questions and the student’s answers may lead to different branches, including different video clips, EHR updates, and questions.
Option 1: Yes: Adds the available Simulation Assignments for any of the related Personalized Learning topics selected on the previous (Select Content) tab.
Option 2: No: Excludes Simulation Assignments at this time.
Note: As with the Clinical Judgment Assignments above, pre-set assignment content will be based on Personalized Learning content selected at the time of class creation. If you choose to “turn off” Personalized Learning content after class creation, the corresponding pre-set assignment will be deleted; however, no automatic pre-set assignments can be added after class creation.
Select Next Step to confirm your selections and proceed to the next tab.
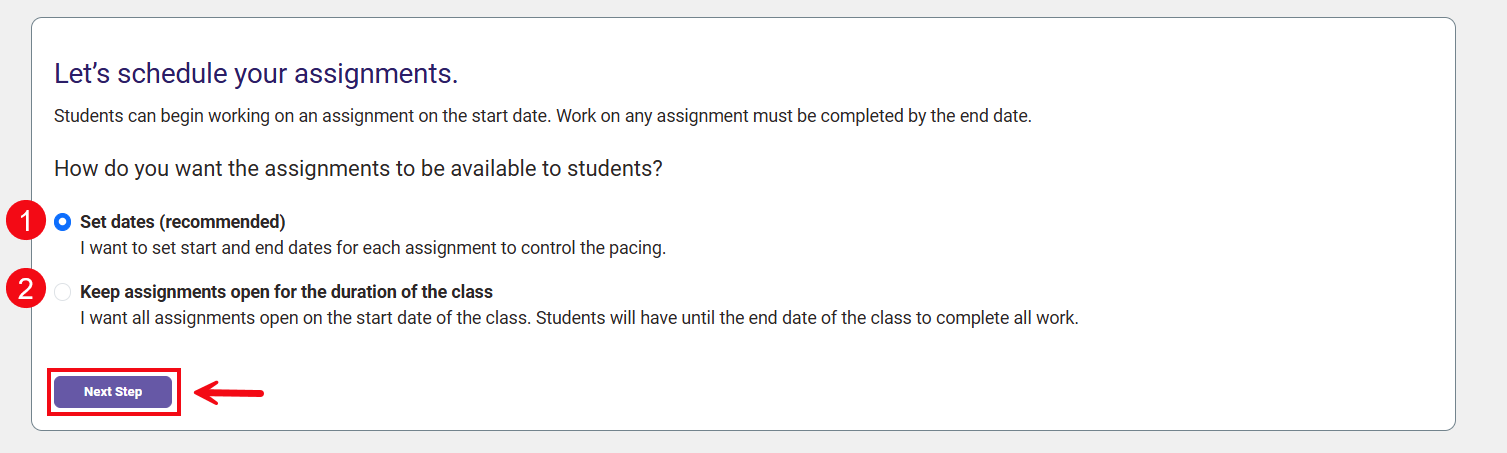
Schedule Content

On this tab, you will select whether to Set Dates for content or to Keep Assignments Open for the duration of class.
Option 1: Set Dates: Allows you to set Start and End Dates for each assignment to control the pacing. This option is recommended.
Option 2: Keep Assignments Open: Allows students to self-pace. Students will be able to access all assignments beginning on the Start Date of the class and will have until the End Date of the class to complete all assignments.
If you choose to Set Dates, click Next Step and you will be able to manually select Start and End Dates for each Personalized Learning, Clinical Judgment, and Quizzing Assignment.
Click the Calendar Icons to adjust dates.
The Start Date is the date on which students can begin working on an assignment (Start time is the first minute of the day, 12:00 AM.)
The End Date is the final day on which students can submit their work "on-time." (End time was selected on the first tab in Class Setup, Create Class.)

Note: End Date selections may reorder content if dates do not match the sequence previously selected on the Select Content tab. Students' assignments will appear on their Dashboard and in their Assignments view according to assignment Due Dates.
If you choose to Keep Assignments Open for the duration of the class, all Assignments will be open as of the Class Start Date and will remain open until the Class End Date.
Select Next Step to confirm your selections and proceed to the next tab.

Grading Options

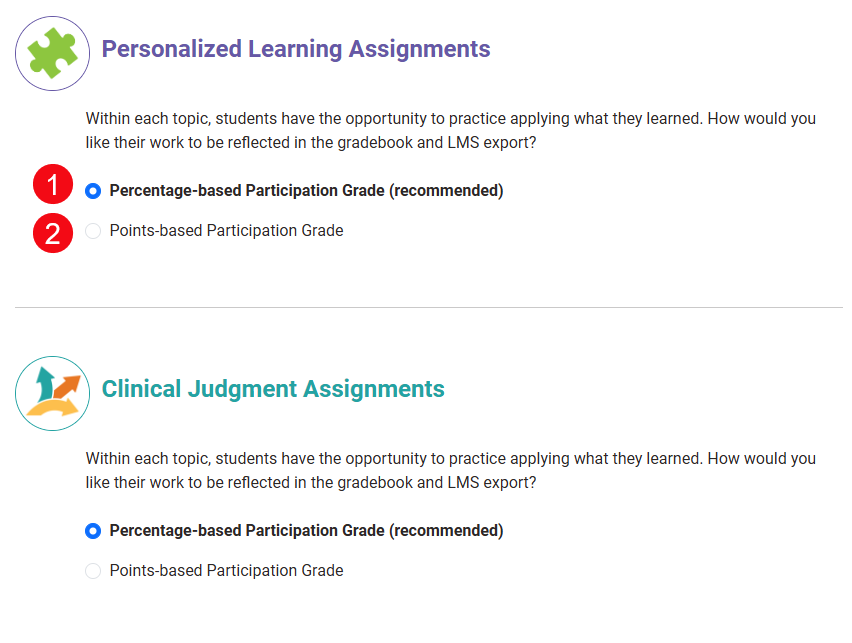
On this tab, you can select how each assignment type is graded and how that grade appears in both the student and instructor Davis Advantage Gradebooks.
Selections can be made for each Assignment Type (Personalized Learning, Clinical Judgment, Simulations and Quizzing), and the selection you make will impact all assignments of that type.
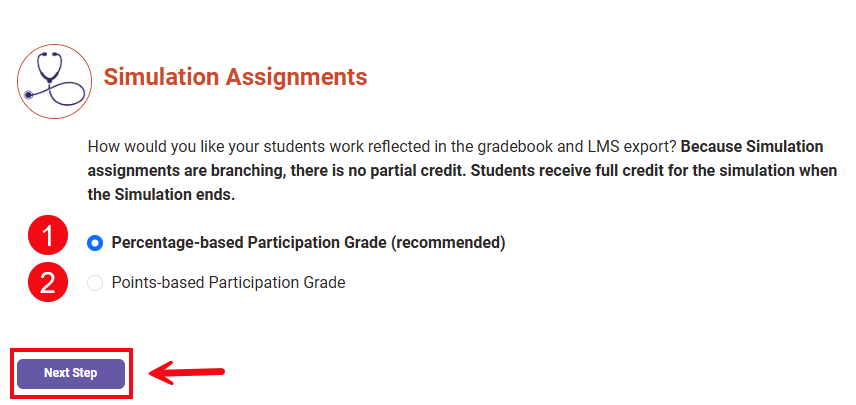
Personalized Learning Assignments, Clinical Judgement Assignments and Simulation Assignments are graded based upon completion, regardless of your selection here. That is, students receive full credit for having completed each part of the Personalized Learning Assignment, regardless of their score on the questions within the Assignment.
Option 1: Percentage-based Participation Grade (Recommended): Students' grades will be displayed as the percentage of work complete between 0-100%. (Students will receive "100" points if they complete the assignment, or 50 points if they complete half of it.) This approach keeps all grades out of a possible 100 points, and tends to be the easiest option.
Option 2: Points-based Participation Grade: Students will be graded on the percentage of work completed, adjusted to scale in terms of the number of points you select for each Personalized Learning Assignment, Clinical Judgement Assignment or Simulation Assignment. (If you select 4 points, students will receive a "4" if they complete the assignment, or a 2 if they complete half of it.) Use this option only if you need each individual assignment to be "worth" a specified number of points such that they all "add up" to a specific total at the end of the course. Note that if you use this option, you should communicate how much each assignment is "worth" (its selected point value) to students, so that they know, e.g., that a 4 is 100%.
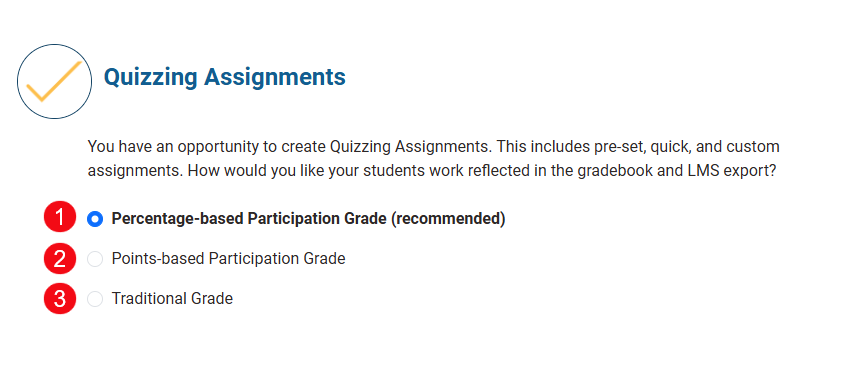
Quizzing Assignments allow for the same options outlined above (Percentage-based Participation Grade and Points-based Participation Grade), as well as a Traditional Approach.
Option 1: Percentage-based Participation Grade: Students' grades will be displayed as the percentage of work complete between 0-100%. (Students will receive "100" points if they complete the assignment, or 50 points if they complete half of it.)
Option 2: Points-based Participation Grade: Students will be graded on the percentage of work completed, adjusted to scale in terms of the number of points you select for each Personalized Learning Assignment. (If you select 4 points, students will receive a "4" if they complete the assignment, or a 2 if they complete half of it.)
Option 3: Traditional Grade: Students' grades will be displayed as the percentage of questions answered correctly for each assignment (students will be penalized for incorrect answers, rather than receiving full credit for merely completing the Quizzing Assignment.)
Simulation Assignments, as noted above, are graded based on completion. Select Next Step to confirm your selections and proceed to the next tab.
Summary

The Summary tab allows you to review the selections you've made for your course.
Class ID
Each class created in Davis Advantage will have a unique Class ID, displayed here on the Summary.

You can also view the Class ID on your Active Classes page when you first log in to Davis Advantage.
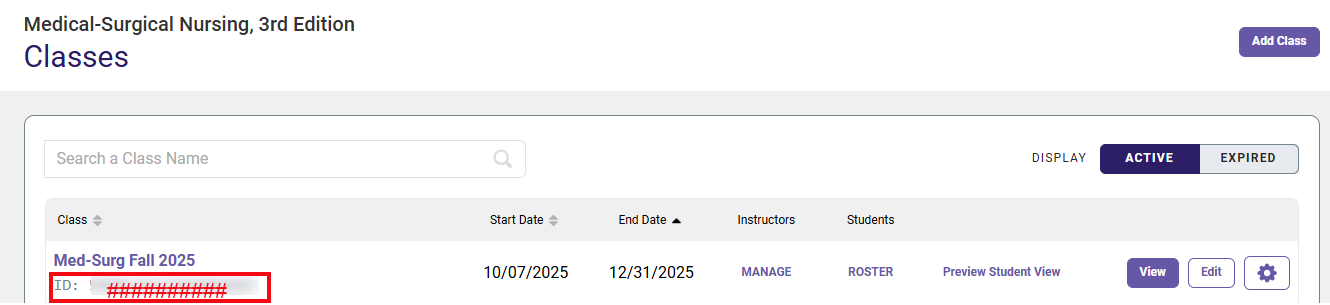
This Class ID will also be sent to the email address associated with your account.
Note: You must provide this unique Class ID to your students for them to access your Davis Advantage class, take assignments, and submit their scores to your Gradebook. It is recommended that you paste your Class ID and and instructions for students on how to join your class into your syllabus or Learning Management System, or otherwise email the information to students directly.
Below the Class ID, the Summary will display the Content, Dates, Experience and Grading rules you have selected. Use the "Edit" buttons to the right to make changes at this time.
Complete the Class Setup by selecting Go to Dashboard at the bottom of the page. You can also Print (or Save) the Summary for your records or to be copied/pasted to your syllabus or Learning Management System.

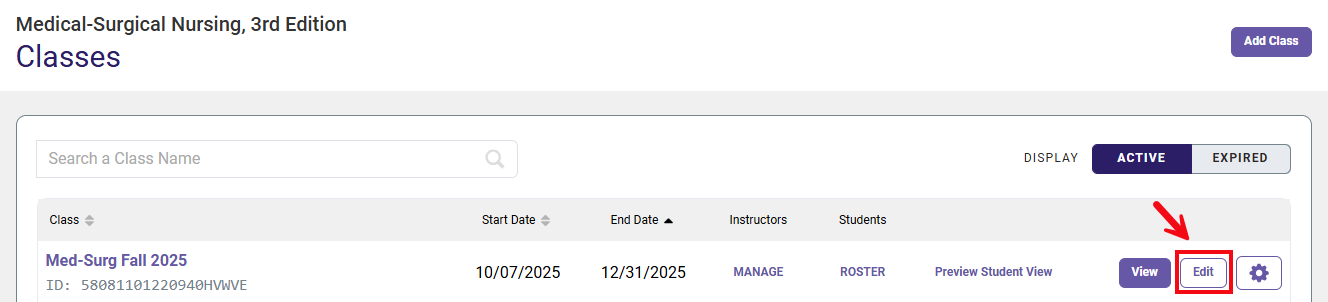
Once you've finalized the course, you may return to Class Setup any time by clicking Edit from your Active Classes page.
Note: while some course settings can be adjusted once students have begun working, it is recommended that you finalize all course settings in the Class Setup process before students enroll.

