

Instructor: Create and Customize a Class: Surg Tech in Practice from F.A. Davis on Vimeo.
After you have logged into Surg Tech in Practice, the Classes page will appear. Your active classes will be displayed on this page. You must create a class in order to track your students’ progress.
Click the Add Class button.

After clicking the Add Class button, the Class Set-up page will open.

Class Details
Enter your class details.
First, enter the name of your course. This is a required field.

You can also enter a description of the course for your students. This field is optional.

Enter the start and end dates for your class by selecting the calendar icon. These are required fields. The Class Start Date is the first day on which your class will be available to your students. The Class End Date is the final day on which your students’ work will be accepted. After their class ends, students will still have access to Surg Tech in Practice as a resource for the remainder of their 4-year subscription period.

By default, your class will end at 11:59 p.m. Eastern time on your designated End Date. However, you may adjust the End Time and/or Time Zone.

Auto-Enroll Students will be pre-selected so that your students are automatically enrolled in your class when they enter your Class ID. (See the section on Class ID.) If you do choose not to use the Auto-Enroll function, you will need to manually accept student requests to join your class. (See the section on Student Roster.)
![]()
Check the Include Independent Study box if you want students’ independent work (any work completed outside of a class) to be imported into your class upon enrollment. Work from other classes cannot be imported. Leave this un-checked if you want all students to begin with a “clean slate.” We recommend starting fresh.
![]()
You will be asked to choose whether you would like to customize your class settings or use the default settings. Once you have made your selection, select Next Step. Please note you must select Next Step to save and advance to the next section of class creation.

*If you have chosen to keep the default settings, please skip to the Class ID section of this guide.
Customize Content
Each Surg Tech in Practice module contains multiple topics. To expand and view the topic level, click the Details button. To see the content for a topic, click Preview Content.

Select Content
You have the option to customize your course by selecting the topic areas you wish to include. By default, all modules and their sub-topics are included, but you may remove a module and/or sub-topic by clicking the button in the Status column to turn an entire module or selected topics within a module from ON to OFF.
You can turn an entire module off OR turn off only selected topics within the module.

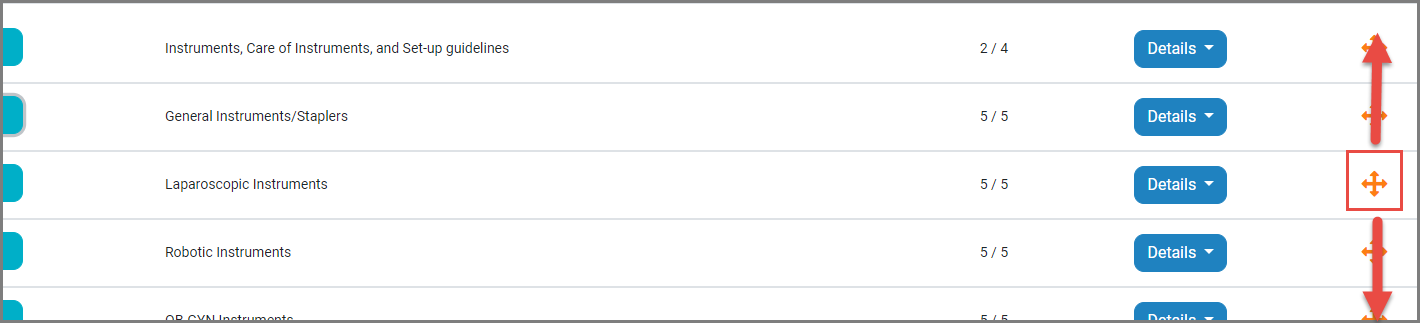
To change the order of the modules to match your course, click and drag a module using the ✥ icon in the right column on the page.
To save and continue, select Next Step at the bottom of the page.

Next, you will be asked to schedule the course content. The three options are outlined in this section. Please note, you must select one of the following three scheduling options: Set Dates, Keep Assignments Open, or the Tollgate Approach.
If you choose to Set dates, you will be able to manually enter start and end dates for each module. This allows you to control the pacing of your course. Click the calendar icon to set the date. The Start Date is the date on which students can begin working on the assignment. (The start time is 12:00 a.m.) The End Date is the final day that students can submit their work for it to be considered on-time. (The end time default is 11:59 p.m. but can be changed. See below.)

You can designate the End Time for all assignments at the bottom of the page. Work submitted after the designated end date/time will be marked Late in the Gradebook. (See the section on Late Work.) The time zone here will match the time zone you chose in the initial class setup.

If you choose to Keep assignments open for duration of class, all modules will be open as of the class start date, and will remain open until the end of the course—i.e., if your course ends on 12/31/2021, all assignments are due on 12/31/2021.

If you choose to Use tollgate approach, this means that upon completion of a module, the next module in the course sequence will become available. In other words, a student cannot move on to Module #2 until Module #1 has been completed, and so on.

Once you’ve made your selection, please select Next Step at the bottom to save and continue.

Grading Options
You have the option to choose grading rules for each module in Surg Tech in Practice. Recommended rules are pre-selected, but can be customized. There are three approaches: Grade on First attempt, Practice and Then Grade, and Practice Only.
Grade on First Attempt approach is defined below:
Students may only take the assessment once. Students scores will immediately be submitted to the Instructor.

Practice and Then Grade approach is defined below:
Students will be able to attempt the assessment multiple times. When satisfied with their score, they will be able to submit it to their Instructor.
Notice that you can select a different grading approach for each module in Surg Tech in Practice.

Practice Only approach is defined below:
Students will be able to attempt all activities and assessments as many times as they'd like (and see the correct answers) without submitting for grading.

Test Bank Assignments
In addition to the module activities, you can include Test Bank Assignments to evaluate your students’ understanding of multiple content areas. Test Bank Assignments will record your students’ raw score in the gradebook.

To skip this step, select I do not want to create a test bank assignment at this time. The instructions below show you how to create a Test Bank Assignment:
Select the option to create a test bank assignment (1).
Enter a name for your assessment (2). This is a mandatory field.
Adjust the start/end dates and end time, if desired (3).
Select either 10 questions,25 questions or 50 questions (4).

Next, turn ON the topics you want to include in the test bank assignment.

If you would like to create another Test Bank Assignment, select Create Another Assignment at the bottom of the page. When you are finished, select Next Step.

You can return to the Test Bank Assignments tab at any time to create additional assignments, or to preview/edit existing ones.
To proceed to the Summary tab and complete class setup, select I do not want to create a test bank assignment at this time (1). Click Next Step (2).

View Summary
The last step of class setup provides a Summary of all the content you have chosen to include in the class.
Please take a moment to note your Class ID.
Class ID
Each class created within Surg Tech in Practice will have a unique Class ID. It is recommended that you paste your Class ID into your syllabus or learning management system or send it in an email to your students. You must provide the unique Class ID to your students in order for them to access your Surg Tech in Practice class, take assignments, and submit their scores to your Gradebook.

The Class ID will also remain on your Classes page for future reference and will be sent to the e-mail address associated with your account.

Finalize the Class
In the Summary tab, you can make any changes to Module Content, Grading Rules, or Test Bank Assignments by clicking the Edit buttons, which will direct you back to the appropriate tab.

To print the Summary Outline of your course (to distribute to the class as a syllabus, for example,) click on the Print Summary button at the bottom. Complete the Class Creation process by clicking Go to Dashboard at the bottom of the page.


